

This post is long overdue!
I created the video, but wanted to share the photos we snapped at the party!
November was a crazy busy month for us as a family and for my new
business HAPPY MOMMY BOX…It was our launch month!
Middle of November came and I flash backed to when I was in the hospital a few hours after giving birth to Micah and I had some amazing blog readers comment via social
media on how they were so excited I had a boy and couldn’t wait for his first birthday
insert panic face as Micah’s party was 5 days away and all I had was
an invite out and matching cake and cookies ordered.
My creative juices were slightly burnt out after all the stuff going on in our life…
I wanted to do a big awesome party but at the same time…
I just knew for my sanity I couldn’t go big this time. I couldn’t.
With the weather being cold, our house small, and not wanting to use another space…
I knew we could only invite a few families! I also didn’t have time to do any
extravagant party projects. I figured doing laundry and playing with my kids was
a better use of my time during our busy month! So I decided…
I was gonna do a small party for Micah with thoughtful details!
The DIY lover in me couldn’t resist certain party details.
But everything I did, I was able to put together within a couple days of having the party.
A trip to target and the grocery store. and done.
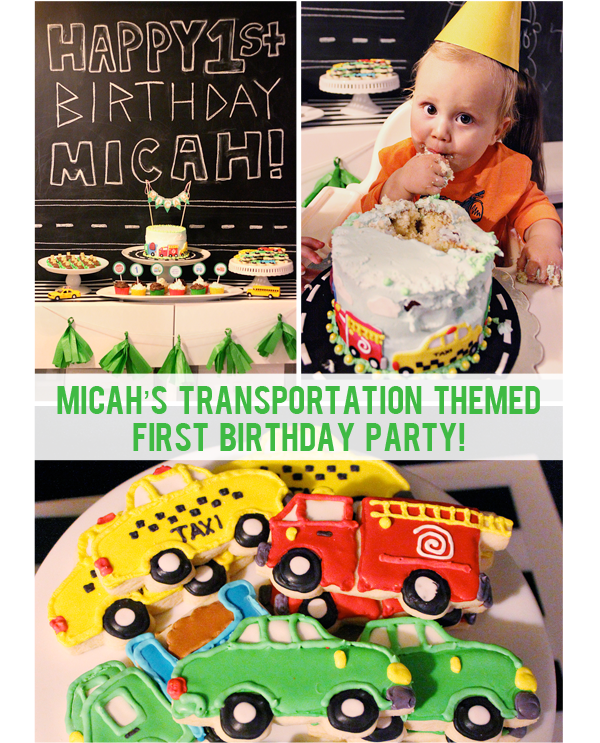
Micah loves anything with wheels so I knew that I wanted to do a transportation
themed party. But when I went for inspiration or party supplies all I
could find was cars the movie themed stuff!
We love that movie in our house, but I had a different look in mind.
I knew I wanted the design modern and fresh and more classic with a variety of vehicles.
We has just painted a chalkboard wall in our basement IKEA Makeover and
I wanted to use it as a backdrop… so black and green were my
main colors with pops of bright colors.
I made up the invite and e-mailed it to friends. (kinda last minute person here.)
I am lucky to have some amazingly creative friends and was able to send over my invite and they worked their magic with cookies and a cake that matched!
I WAS IN LOVE WITH THEM!! Details on their amazingness below.
I knew that having those two fun themed details would help
make the party special… now I just had to throw together some
other little details to make it all come together!
I love a good dessert table! Especially a budget friendly one!
When I have parties I usually move around furniture! I pulled over our IKEA
hutch…grabbed 3 of our IKEA place mats from the kitchen and strung up a tissue
paper tassel garland across the front of it. (also used the same diy at
my cookie exchange in 2011.) We had just painted the chalkboard wall
and I LOVE IT. So It was fun having it be a part of the party.
Cheapest backdrop ever. Doodled a Happy Birthday Sign
and a road. boom. done. The trick is to smudge the lines with your
finger after you write it. At least thats how I like to do it.
My Friend Jacquie of The Sweeter Side of Mommyhood, seriously does it ALL.
One of her many talents is cake decorating! She created this smash cake for Micah
and it matched the invite perfectly! and it was totally by coincidence that she did
a road for it to sit on that matched my chalkboard backdrop!
and it matched the invite perfectly! and it was totally by coincidence that she did
a road for it to sit on that matched my chalkboard backdrop!
I whipped up a batch of homemade cupcakes with store bought frosting on them.
(I love the tall tube kind already ready for decorating! although, homemade frosting tastes the best!)
(I love the tall tube kind already ready for decorating! although, homemade frosting tastes the best!)
My girls helped me make up some car treats! We used fun size Milk Ways with mini
teddy grahams and green m&m’s attached with icing (I got a small pack of icing ready
to go- easy and fast project!) The kids LOVED them. and I thought they looked pretty cute ;)

My friend Colleen of Sugar Aunts created the AMAZINGGGGGLY cute sugar cookies!
I have worked with her a few times.. she did the cookies for my Back to School Play Date Display at IKEA. She’s amazing. Learning how to do that is on my bucket list. They taste as good as they look too. I couldn’t believe how perfectly the cake and cookies went together.
If you don’t have time to plan a lot of party details..just doing a couple key things like that can just make it all come together and feel special!
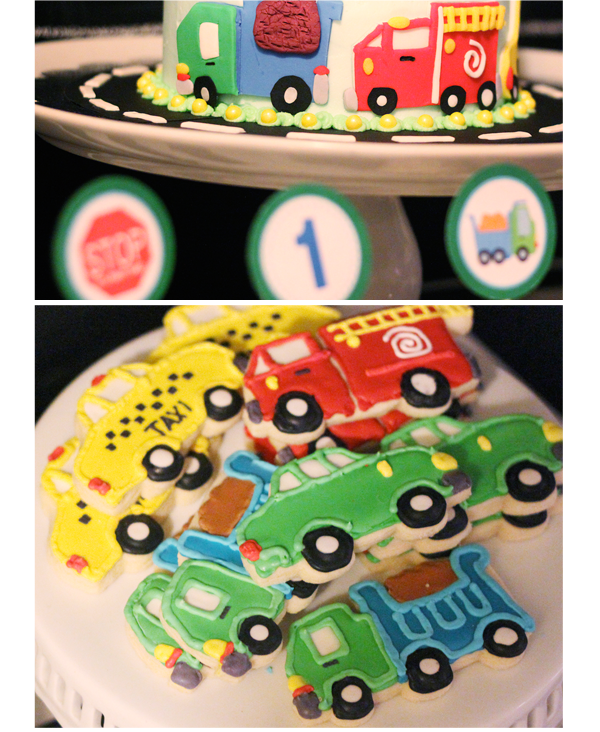
I created some cupcake toppers in Photoshop. Pulling the vehicles I used on my invite.
It just wouldn’t be a party in my house without some cupcake toppers ;)
I like the “STOP. It’s party time!” one hehe.
Cupcake wrappers are from Target. They were a fun colorful pack, I pulled
out the red, yellow and green ones!
Cupcake wrappers are from Target. They were a fun colorful pack, I pulled
out the red, yellow and green ones!

I grabbed the taxi and school bus toys from Micah’s room
and the toy bin… and the table was done!

We had another treat table in the space!
I found this felt Happy Birthday Banner at Target……I MIGHT have done
a “YESSSSSS!” in the store when I found it in the party section
and it cost like $4.99…. C’mon. That is budget and time friendly!!
I could have made one but I didn’t have time, and it was so well made!
I filled up some bowls with red, yellow and green m&m’s patiently sorted by my clean handed little sophia. She loved it. I mean.. loved loved it.
Give this girl a project and she is all about it.

I am not a fan of making rice crispie treats. I’ve had one too many fiascos. BUT.
I couldn’t justify buying store bought ones, when I already had the cereal and the marshmallows were a buck or something crazy. So I faced my fears..and actually
made them without destroying the kitchen!
I couldn’t justify buying store bought ones, when I already had the cereal and the marshmallows were a buck or something crazy. So I faced my fears..and actually
made them without destroying the kitchen!
A couple tricks helped keep me sane! I then sliced them up into stop light strips..
cut paper straws (from target’s party section) in half and stuck them in the
rice crispie treats. Used the same single icing pack I used for the car treats above and “glued” the red, yellow and green m&m’s on them.
cut paper straws (from target’s party section) in half and stuck them in the
rice crispie treats. Used the same single icing pack I used for the car treats above and “glued” the red, yellow and green m&m’s on them.
These flew off the table and into the mouths of the children. haha.
Kids like to hold their food and eat things off sticks. it’s just a given.
I didn’t want to stack them on top of each other..and didn’t have a platter long enough…
So I just taped some wax paper down to place them on. I also stacked
up some oreos… they were black like my roads and looked like wheels.
tasty and easy. had to have them.

I documented my growing baby bump with Micah on my blog.
I created a baby book with them… each week I had wrote a letter to “baby.”
It was so fun looking back and seeing what was going through our heads..usually commenting on how the girls were so excited and were painfully
high fiving my belly with excitement to meet him or her.
I ended up printing out all of them and taping them on the wall!
It’s such a miracle. He was in my belly growing and kicking me..and now he is out
zooming around doing laps around our house and kicking his sisters. awesome.

I love photos. I take A TON. and I want to enjoy them!
So for the other treat table backdrop, I printed and taped up a bunch of photos from Micah’s first year of life. I attached them to the IKEA magnetic boards we have above my desks, but I plan on taking them off and creating some artwork with them to hang in his room!
I loved looking back at all of the memories.

For the favors I bought some chocolate donuts. (inexpensive) put them
in snack size ziploc bags and stapled some treat bag tags I made up with Micah’s cute mug on em. I couldn’t resist some photoshop fun. Also made up a sign.


CAKE TIME!
It was everything we wanted. We really wanted a smasher.
Our girls were always too delicate and dainty. but Micah, leading up to his birthday,
started eating real food like a manly man and smashing bananas to smithereens…
we knew we had a good one! It took him a bit to warm up. but once he saw his sisters
sneak some icing he got the idea. Hand straight down the middle of the cake…
He didn’t get his face messy but he got elbow deep into cake. ;)
(hat leftover from girls’ party. Ikea high chair. diy tissue paper tassel garland)


PRESENT TIME.
His sisters and their friends graciously offered to open presents FOR him.
Micah was happy to just do the playing. and eating.


We had car themed tattoos.. I tatted the kids up good.

Activity wise..what do you do for a 1 year old??
I had these huge boxes from our IKEA KIVIK sofas…and I had planned in my head weeks before that I was going to turn them into a fire truck. didn’t happen.
But one day when micah was down there I saw he was the perfect height to walk around it!
It hit me..A play mat..on the box! So I sketched out a little drawing of the BASICS that must be in a town…. school, church, houses, target, IKEA, chick-fil-a, grocery store, cafe, play ground, lake, ice cream store, hospital, gas station, car wash, zoo and fire station. the BASICS you can’t live without.
I first drew with pencil and then outlined with markers. MICAH LOVED IT!
He scooted around the box rolling his cars back and forth on it.


It was a fun party! And I still can’t believe he is one.
I’m already planning his rehearsal dinner.
jk.
but seriously.
WE LOVE YOU MISTER MAN!
(as your sisters call you. ;)
Here’s the video in case you missed it!
Thanks for checking out Micah’s first birthday party!
Here’s the video in case you missed it!
Thanks for checking out Micah’s first birthday party!
In This Wonderful Life
December 14, 2013 at 11:39 pmSUCH a cute party!!! I love all the details! I also cannot believe he is already a year!
K Naga Prathap
December 16, 2013 at 8:35 amSkoda service
Best Car Servicing in Chennai that includes Engine Diagnosis, Car Customizing, Accident Collision Repair, Car Painting, Car Maintainence and much more…. Log in to TheTorque.in
Party Siempre
January 4, 2014 at 2:37 amHello,
This blog is too much nice.This party is awesome.It’s the perfect time to enjoy with friends.I love party.Thank you for this great post.
Party Siempre
Leslie Anne
August 29, 2014 at 10:15 amHi, May I know the font you used for the sign that says “beep beep Micah”?
gina Antunez
December 30, 2016 at 2:30 pmdo you sell your party printables ?
natalie
January 3, 2017 at 11:53 pmsome of them! they are in my etsy shop! I don’t think I have any from this party though listed. sorry!
http://www.etsy.com/shop/athomewithnatalie